Canon Camera Not Reading SD Card - 7 fixes
Background
It's hard to tell which part is to blame for Canon digital camera not reading its sd card. This page tells 6 fixes that you may try to fix possible errors and determine which part of your camera or sd card is damaged to get to the root of the problem.
These solutions are for all Canon camera types with their memory card, not limited to these following types
- canon c100 not reading sd card
- canon rebel t1i not reading sd card
- canon 6d not reading sd card
Canon SD Card Not Detected 7 Fixes
#1 Check if the SD card lock is turned on
Turn off the camera, pull out the sd card and check whether the sd card has been locked. When the lock switch is upside, it is not locked; otherwise it's locked from being read/write if the lock switch is downside.
Solution: Push the lock switch to upside to get it unlocked.

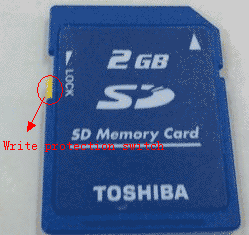 SD card is locked when the lock switch is down
No sd card lock to check? Use a card reader that has lock switch to turned it to off the lock.
#2 Turn off camera and backup images/videos from sd card
When your camera Canon does not detect the memory card sd/sdxc/sdhc, the very first step is to get it power off. Pull out the sd card from your Canon, and insert it to pc for backup if it still could be recognized in the PC.
Copy all files on sd card, and then paste them to somewhere else on your hard drive volume as backup. We recommend you create a special folder for your sd card on your volume at first, and then you may copy and paste the files to get them all included in one folder.
Note: If your Canon camera has wifi, you may upload your data to somewhere as backup if you can still read it on sd card. (The bad, usually when sd card is not detected in Canon camera, neither can the data be read in normal ways.)
SD card not reading/accessible? => Restore data from sd card with special tool.
Canon SD Card Recovery (100% Safe)
When sd card is not accessible, some special professional tool such as iCare Data Recovery Pro can help retrieve data from sd card.
The above link provides tools for unlimited free file recovery on Windows. However, a subscription fee is required for data recovery on Mac.
#3 Format the SD Card with Your Canon Camera (This Method Often Works)
If you're experiencing issues with your SD card on a Canon digital camera, reformatting the card directly in the camera is a simple and effective solution. The camera will automatically prepare the card with the appropriate file system, resolving read or write errors that may be caused by file corruption or improper formatting. Follow the steps below to format the SD card using your Canon camera.
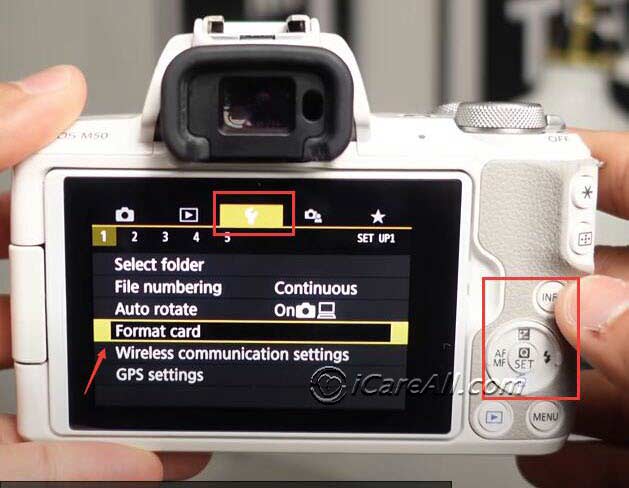 Formatting the SD card directly in your Canon camera can resolve issues related to the card being unreadable.
Steps to Format the SD Card in Your Canon Camera:
- Turn on your Canon camera and press the Menu button to access the camera's settings.
- Navigate through the menu options using the camera's arrow keys or scroll wheel until you find the Format Card option. This is typically found under the Wrench or Settings tab, depending on the camera model.
- Select the Format Card option and press OK or Set to confirm.
- A confirmation prompt will appear, asking you whether you'd like to format the card without low-level formatting. Choose Format to proceed with the standard format. This is often sufficient for most issues.
- If the problem persists after standard formatting, you can repeat the process and choose the Low-Level Format option. This method takes longer but can help in more stubborn cases where the SD card may be more severely corrupted.
Note: Formatting the SD card will erase all data on it, so ensure that you have backed up any important files before proceeding. Low-level formatting is more thorough and might take longer but can resolve deeper issues with the SD card.
Once the formatting process is complete, the SD card should be ready for use. If the card continues to have issues, you may need to try a different card or consider professional recovery tools.
#4 Format SD Card on PC Using Right-Click Formatting in File Explorer (This Method Often Works)
Formatting your SD card directly on a PC using File Explorer is one of the simplest ways to resolve issues related to your memory card. If your SD card is not working properly or needs to be prepared for use in a new device, right-click formatting in File Explorer will allow you to quickly reformat it with the appropriate file system.
Steps to Format the SD Card in File Explorer:
- Insert your SD card into your computer using a card reader. Most modern laptops have a built-in SD card slot, but you can also use an external card reader if needed.
- Once the SD card is inserted, open This PC or My Computer (depending on your Windows version).
- The SD card will appear as a removable storage device under the Devices and Drives section. It may be labeled as "Removable Disk" or with the card’s name and capacity.
- Right-click on the SD card’s volume (the drive that represents your SD card) and select Format from the dropdown menu.
- In the format window that opens, choose the appropriate file system for your device:
- FAT32 is commonly used for SD cards smaller than 32GB and offers wide compatibility across most devices.
- exFAT is recommended for SD cards larger than 32GB, as it supports larger file sizes and works with most modern devices.
- Uncheck the Quick Format option if you want a more thorough format. Otherwise, leave it checked for a faster process.
- Click Start to begin formatting the SD card. A warning message will appear, reminding you that all data on the SD card will be erased. Confirm to proceed.
Note: This method is typically fast and effective for basic formatting. If the SD card is corrupted or experiencing more severe issues, you may need to use a more advanced tool like Disk Management.
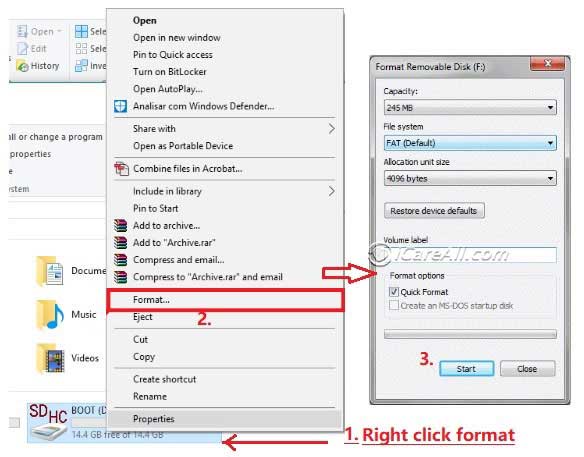 Format your SD card using right-click formatting in File Explorer
#5 Format SD Card Using Disk Management in Windows Computers
If formatting the SD card using File Explorer’s right-click method doesn’t work, or if you receive an error message such as “Unable to format,” you can use Disk Management as an alternative method. Disk Management is a more advanced tool in Windows that allows you to manage drives and partitions. It's useful for formatting SD cards that may be corrupted or unresponsive to simpler methods.
Steps to Format the SD Card Using Disk Management:
- Insert your SD card into your computer using a card reader.
- Right-click on This PC or My Computer and select Manage to open the Computer Management window.
- In the left-hand menu, click on Disk Management under the Storage section. This will display all the drives connected to your computer, including your SD card.
- Locate the SD card in the list of drives. It will typically appear as a removable drive with its size indicated.
- Right-click on the SD card’s volume and select Format from the context menu.
- In the format window, choose the file system (either FAT32 or exFAT, depending on your card's size and usage requirements) and click OK to proceed with the format.
- If the format option is grayed out or unavailable, you may need to first delete the volume by selecting Delete Volume and then create a new partition using the New Simple Volume wizard.
Note: Disk Management is particularly useful for SD cards that are experiencing file system errors or corruption. If you continue to encounter problems, it may be worth trying specialized third-party software to recover the card.
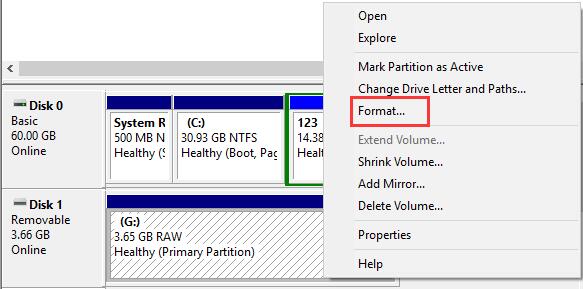 Format your SD card using Disk Management if File Explorer fails
#6 Repair sd card with chkdsk cmd in Windows computers
- Step 1: Insert sd card to pc with a card reader, if it's a micro sd card, you need to prepare a card adaptor if there was no slot for micro sd card
- Step 2: Open Run from Start on Windows, and type 'CMD' to get started
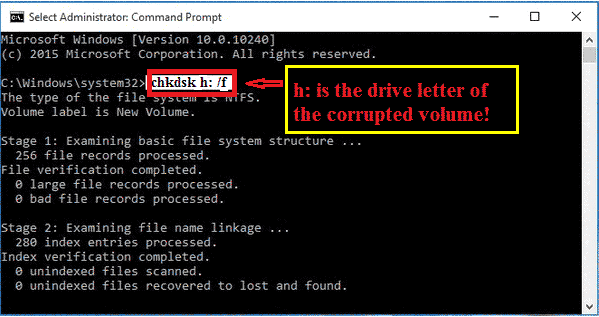
- Step 3: Type 'chkdsk h: /f' when your sd card shows drive h in your computer, so please replace h with your own sd card drive letter, for example, if it shows e, your cmd shall be 'chkdsk e: /f'
#7 Bent card reader repair/replacement (Needs professional repair service)
Check sd card reader pin to see any bent on the pin since mostly it's one or more pins that were bent and the camera will not read the sd card
Video - why is camera not reading sd card
Also read: sd card not detected in camera 8 fixes
Extra Knowledge and Points
Possible Causes when Canon Is Not Reading SD Card
1. The memory card is not properly inserted into the camera (loose or other reasons), so that the camera cannot read it.
2. The metal contact of the memory card is oxidized. After taking it out and cleaning, reinstall it for test to see whether it can be read normally.
3. The memory card is in protected mode or locked.
4. Memory card sd is infected with virus.
5. There is a logic fault in the memory card, which can be solved by formatting under normal circumstances.
6. The memory card is damaged/read.
Other Canon Common Error Checking
Canon camera common troubleshooting:
PartA, the flash does not glow
1, Not set the flash. Press the flash pop-up lever to set the flash.
2, The flash is charging. Wait until the orange light stops flashing
3, The photo object is bright. Use auxiliary flash mode.
4, The flash is working abnormally when the indicator lights up on the control panel when the flash has been set. It shall be repaired.
PartB, the camera does not function
1, The power is not turned on, press the power button to turn on the power.
2, The battery polarity is installed wrong. Reinstall the battery correctly.
3, Battery is exhausted. Renew the battery.
4, The battery is temporarily invalid. When using, please keep the battery warm; in between photos, do not use the battery temporarily.
5, The card cover is opened. Close the card cover.
Hot Articles
