Recovering formatted NTFS partition - 3 Steps
Quick Navi
Steps to Recover Data from Formatted NTFS Partitions Free
iCare Recovery Free can help retrieve formatted ntfs volumes when the format was done by mistake or when ntfs partition warns a formatting required on the partition...
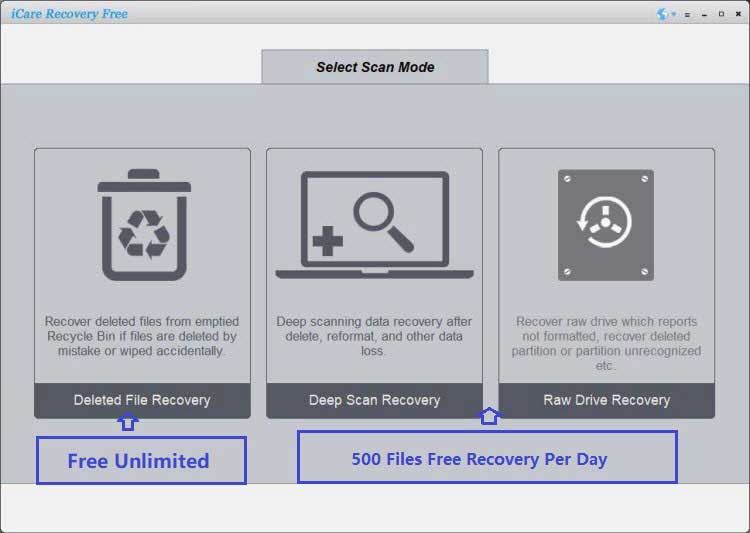
Step1. Download and install the data recovery software on your computer. Launch the software and choose a recovery module.

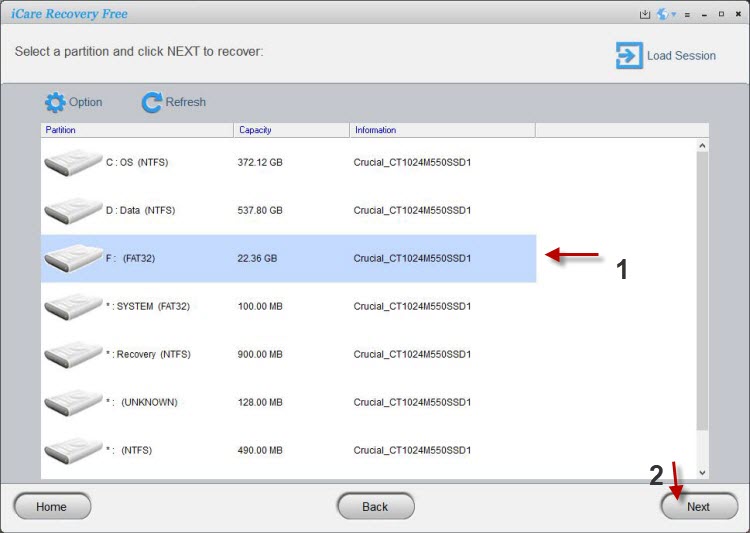
Step2. Choose the formatted partition and let the software scan. You only need to wait when the software is scanning.

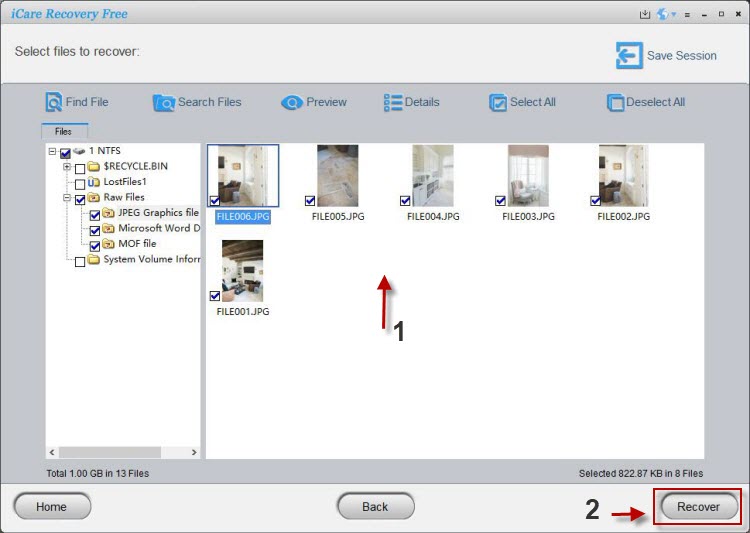
Step3. Photos can be previewed for free to make sure this program is able to restore your lost files. Then, you can select the files you need and save them.

Unformat ntfs partition using cmd/Testdisk
If you want to unformat an NTFS partition, you can try using either the Command Prompt (CMD) or a data recovery tool like TestDisk. Here's a brief overview of the steps for each method:
Unformat NTFS Partition Using CMD:
- Open Command Prompt as an administrator. To do this, press the Windows key, type "Command Prompt," right-click on it, and select "Run as administrator."
- In the Command Prompt window, type the following command and press Enter:
chkdsk /f X:
(Replace "X" with the drive letter assigned to the formatted NTFS partition.) - The chkdsk utility will start scanning and attempting to recover the lost file system information. Follow the on-screen instructions if prompted.
Once the process completes, check if the partition has been successfully unformatted and if your data is accessible.
Note: The chkdsk cmd will not recover formatted ntfs partition data.
Unformat NTFS Partition Using TestDisk:
- Download and install TestDisk on your computer from the official website (https://www.cgsecurity.org/wiki/TestDisk_Download).
- Launch TestDisk and select the disk containing the formatted NTFS partition.
- Choose the partition table type (usually Intel/PC) and proceed.
- Select the Analyse option to search for deleted or lost partitions on the disk.
- TestDisk will display a list of found partitions. Look for the formatted NTFS partition and highlight it.
- Choose the "Quick Search" or "Deeper Search" option to let TestDisk analyze the partition further and attempt to locate the original file system structure.
- After the scan completes, TestDisk will show a list of partitions it has found. If the formatted NTFS partition is listed, select it.
- Use the "P" key to preview the files and check if they are recoverable.
- If you can see your desired files, select the files/folders you want to recover and press the "C" key to copy them to a different location.
- Once the recovery process is complete, exit TestDisk.
It's important to note that the success of unformatting an NTFS partition depends on various factors, including the extent of formatting, overwriting, and the condition of the disk. It's recommended to attempt data recovery as soon as possible and avoid writing any new data to the formatted partition to improve the chances of successful recovery.
How to format partition ntfs
To format a partition as NTFS (New Technology File System), you can follow these steps on a Windows operating system:
Note: Formatting a partition erases all data on that partition. Make sure you have a backup of any important data before proceeding.
- Open the File Explorer by pressing the Windows key + E.
- Locate the partition you want to format. It will be listed under "This PC" or "Computer" in the left-hand sidebar.
- Right-click on the partition you want to format and select "Format" from the context menu. If the partition is in use, you may be prompted to dismount it first.
- In the Format dialog box, choose NTFS as the file system type. You can also provide a volume label (optional) to give a name to the partition.
- Choose the allocation unit size. It's recommended to leave the default size selected unless you have specific requirements.
- Check the "Perform a quick format" option if you want to speed up the formatting process. However, if you want to perform a full format (which checks for bad sectors on the partition), leave the option unchecked. Note that a full format takes longer to complete.
- Double-check the settings and make sure you've selected the correct partition for formatting.
- Click on the "Start" button to begin the formatting process.
- A warning message will appear, informing you that all data on the partition will be lost. Confirm by clicking "OK."
- The formatting process will begin, and a progress bar will show the status. Once completed, you'll see a confirmation message.
- Click "OK" to close the format dialog box.
Your partition is now formatted as NTFS and ready to use. It will be empty and can be used for storing files and data.
Last updated on March 26, 2025
Related Articles
